Wednesday, August 13, 2014

DP Configuration Status node showing In Progress!!!

1 Week back the team distributed the package to few DP, but after 1 week the status for DP was showing IN Progress....on checking we found that before the package was finished distributing the package was deleted from from sccm 2012. Hence it was still showing the status as In Progress.

But now we need to clear the status, so that console should look Green and Clean...But how????

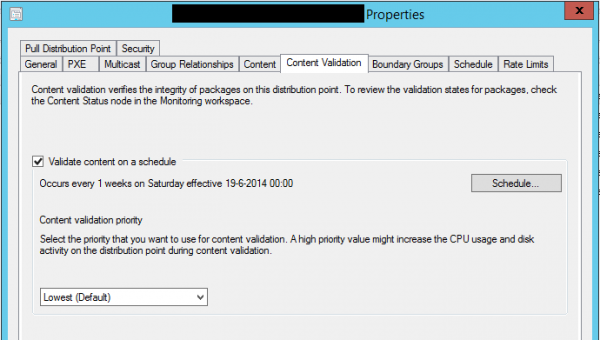
The solution to fix this was easy,Thanks to "Peter Daalmans" since the content was not available anymore. What must be done is enable and configure Content Validation on Distribution Point(s). Content Validation verifies the integrity of the packages on the distribution points.

Enable the Content Validation on the DP

Enable the Content Validation on the DP. After that the Content Validation had done his work the Distribution Point Configuration Status of all distribution points were successful.

Hope This Will Help!!!
Amarpal Singh Sandhu
Delete Stale or Inactive Computer Accounts from SCCM

Some time we see some weird entry in the sccm console relate to client record. When we dig we find that our Collection show more count as compare to the actual count. This happen because of  ADSD.

When ADSD is enabled, Config Mgr Administrators generally discover the entire domain or a major OU structure. Admins are amazed to see the sheer number of PCs discovered by ADSD, however, upon further inspection they notice that these “extra” PCs are in fact old PCs that are no longer active on the network.

They might have a process to physically dispose of a PC, but they forget to remove the PC from AD and sometimes Config Mgr too. This is an important part of the decommissioning process. Without removing decommissioned PCs from AD, it leaves AD in a “dirty” state with lots of stale PCs that are no longer active.

So now we know that we have stale entry in the SCCM and AD. We should find some simple solution to get rid of these records. As I am very lazy to will find something simple that can help me to perform it with 1 click example scripts or Bat or Power Shell. Everyone have different think, so they may need something different.

Below are the few solutions that can help us. (Choice is yours)


1. The First Method is Script :

The credit for this script goes to windows management experts team for creating the beautiful script that work for us, so that we can take nap for few more minutes.... 

Below is the link to Download the script :
http://www.windowsmanagementexperts.com/free-scripts/remove-old-objects-from-ad-and-sccm

2. The Second Method is Power shell :

This PowerShell command/script will query Active Directory and return all computer accounts which have not logged in for the past X (configurable) number of days - or not at all. I've included - and commented out - commands that will either Disable or Remove these accounts if you choose to do so.

# This PowerShell Command will query Active Directory and return the computer accounts which have not logged for the past 60 days.  You can easily change the number of days from 60 to any number of your choosing.  lastLogonDate is a Human.Readable conversion of the lastLogonTimeStamp
$then = (Get-Date).AddDays(-60) # The 60 is the number of days from today since the last logon.

Get-ADComputer -Property Name,lastLogonDate -Filter {lastLogonDate -lt $then} | FT Name,lastLogonDate

# If you would like to Disable these computer accounts, uncomment the following line:
# Get-ADComputer -Property Name,lastLogonDate -Filter {lastLogonDate -lt $then} | Set-ADComputer -Enabled $false

# If you would like to Remove these computer accounts, uncomment the following line:
# Get-ADComputer -Property Name,lastLogonDate -Filter {lastLogonDate -lt $then} | Remove-ADComputer


3. The Third Method is AD Tool :

Here is an easy way to identify and delete inactive or stale computers in an Active Directory environment.  Using the dsquery command you can easily find all of the computers in the directory that have not been logged into in a given time interval or disabled.

The following command will return all computers that have been inactive or stale for 2 weeks:

dsquery computer –inactive 2
image
The following command will return all disabled computer account information:

dsquery computer –disabled
image
You can combine this output with the dsrm command to delete these objects from Active Directory

dsquery computer –inactive 2 | dsrm -noprompt 
dsquery computer –disabled | dsrm -noprompt
image 
Following any of the above 3 method we can keep our AD and SCCM Clean.

Hope This Will Help!!
Amarpal Singh


Tuesday, August 12, 2014

Report Not Showing Free Disk Data SCCM 2012!!!

There was requirement from wintel team for Disk space check on few servers on which they were suspecting disk space issue, So I started my work to get the report using   Hardware 01A – Summary of computers in a specific collection report. And when the result came in I was shock to see that free space date was not there. So after flipping some page in sccm book it gave me the clue.

The Clue was free disk space data is not collected in System Center 2012 Configuration Manager (CM12) by default, so in order to collect this information you will need to enable the attribute within the logical disk (SMS_LogicalDisk) class.


Below are the steps to enable the collection of free disk space data.


Open the CM12 console. Select the Administration node and then Client Settings. In the results pane right-click Default Client Settings and click Properties.


Select Hardware Inventory and then click on Set Classes…


Locate Logical Disk and select Free Space (MB) then click OK until you return to the CM12 console.
Now we have to wait till next hardware inventory cycle, all of your clients will start reporting free disk space data back to CM12. Once the hardware inventory cycle is complete.

 Hope This Will Help!!

Amarpal Singh Sandhu

Tuesday, July 29, 2014

SCCM 2012 Versions!!!

Some time at the time of troubleshooting we need sccm 2012 version that are out till date. So i have mentioned all the versions that i know till date!!!!

CM 2012 RTM - 5.00.7711.0000
CM 2012 CU1 - 5.00.7711.0200
CM 2012 CU2 - 5.00.7711.0301
CM 2012 SP1 - 5.00.7804.1000
CM 2012 SP1 CU1 - 5.00.7804.1202
CM 2012 SP1 CU2 - 5.00.7804.1300
CM 2012 SP1 CU3 - 5.00.7804.1400
CM 2012 SP1 CU4 - 5.00.7804.1500
CM 2012 R2 - 5.00.7958.1000
CM 2012 R2 KB2905002 - 5.00.7958.1100
CM 2012 R2 CU1 - 5.00.7958.1203
CM 2012 R2 CU2 - 5.00.7958.1303

Hope This Will Help!!
Amarpal Singh

Monday, July 14, 2014

Failed To Start SMS SITE BACKUP Service

Hi Guys ,

I would like to share my experience on the issue that i came across in SCCM 2012 when i was running the SMS SITE BACKUP....


ISSUE :

Trying to start SMS SITE BACKUP service manually, but it failed to start. Giving system error 2, specified service cannot find

Resolution :

After checking logs i though to give a try by directly running smsbkup.exe. When i went to the path to execute the smsbkup.exe it was not there..???? And when i looked again at error it was saying File not find...So now next challenge was to get the file , but how????? There i applied the the applied the logic of copy & paste and it work..Woooo. Hooo....

smsbkup.exe was missing from E:\Program Files (x86)\Microsoft Configuration Manager\bin\X64 path, copied same from CAS server and then i was able to start the SMS_SITE_BACKUP service..


Hope This Will Help!!!
Amarpal Singh sandhu

Windows Updates On Server Core Machine!!!!!

Hi Guys ,
One day i got a request to install the patches on Server Core machine... and i was shocked to see that request because i have never done this in past, So i started searching in Google and was very scared because most of the post were scripts. As i was working in production environment there was "BIG NO" to execute any script in environment as it was not tested , so after digging further i came across below 5 Methods that executed in environment based on your choice. I selected "OPTION 3" that was SConfig.
Method #1 - Manually Install Updates
In order to install updates you need to configure the Server Core machine to automatically download and install updates:
At a command prompt:
  • To verify the current setting, type:
cscript scregedit.wsf /AU /v
  • To enable automatic updates, type:
cscript scregedit.wsf /AU 4
  • To disable automatic updates, type:
cscript scregedit.wsf /AU 1
Problem with this setting is that you have no control over what updates are being downloaded and installed. Therefore, if you do not wish to enable auto updates, you can manually download each update from the Windows Update site, transfer them to the Core machine, and then manually installing them using msiexec.exe or wusa.exe:
Msiexec (command-line options)
Description of the Windows Update Stand-alone Installer (Wusa.exe) and of .msu files in Windows Vista and in Windows Server 2008


Method #2 - Install from Script
You can also use the following script sample from MSDN:
Searching, Downloading, and Installing Updates: http://msdn.microsoft.com/en-us/library/aa387102(VS.85).aspx
Set updateSession = CreateObject("Microsoft.Update.Session")
Set updateSearcher = updateSession.CreateupdateSearcher()
WScript.Echo "Searching for updates..." & vbCRLF
Set searchResult = _
updateSearcher.Search("IsInstalled=0 and Type='Software'")
WScript.Echo "List of applicable items on the machine:"
For I = 0 To searchResult.Updates.Count-1
Set update = searchResult.Updates.Item(I)
WScript.Echo I + 1 & "> " & update.Title
Next
If searchResult.Updates.Count = 0 Then
WScript.Echo "There are no applicable updates."
WScript.Quit
End If
WScript.Echo vbCRLF & "Creating collection of updates to download:"
Set updatesToDownload = CreateObject("Microsoft.Update.UpdateColl")
For I = 0 to searchResult.Updates.Count-1
Set update = searchResult.Updates.Item(I)
WScript.Echo I + 1 & "> adding: " & update.Title
updatesToDownload.Add(update)
Next
WScript.Echo vbCRLF & "Downloading updates..."
Set downloader = updateSession.CreateUpdateDownloader()
downloader.Updates = updatesToDownload
downloader.Download()
WScript.Echo  vbCRLF & "List of downloaded updates:"
For I = 0 To searchResult.Updates.Count-1
Set update = searchResult.Updates.Item(I)
If update.IsDownloaded Then
WScript.Echo I + 1 & "> " & update.Title
End If
Next
Set updatesToInstall = CreateObject("Microsoft.Update.UpdateColl")
WScript.Echo  vbCRLF & _
"Creating collection of downloaded updates to install:"
For I = 0 To searchResult.Updates.Count-1
set update = searchResult.Updates.Item(I)
If update.IsDownloaded = true Then
WScript.Echo I + 1 & "> adding:  " & update.Title
updatesToInstall.Add(update)
End If
Next
WScript.Echo  vbCRLF & "Would you like to install updates now? (Y/N)"
strInput = WScript.StdIn.Readline
WScript.Echo
If (strInput = "N" or strInput = "n") Then
WScript.Quit
ElseIf (strInput = "Y" or strInput = "y") Then
WScript.Echo "Installing updates..."
Set installer = updateSession.CreateUpdateInstaller()
installer.Updates = updatesToInstall
Set installationResult = installer.Install()
'Output results of install
WScript.Echo "Installation Result: " & _
installationResult.ResultCode
WScript.Echo "Reboot Required: " & _
installationResult.RebootRequired & vbCRLF
WScript.Echo "Listing of updates installed " & _
"and individual installation results:"
For I = 0 to updatesToInstall.Count - 1
WScript.Echo I + 1 & "> " & _
updatesToInstall.Item(i).Title & _
": " & installationResult.GetUpdateResult(i).ResultCode
Next
End If
Copy the text found in the script, save it as WUA_SearchDownloadInstall.vbs in the system32 folder, and run:
cscript WUA_SearchDownloadInstall.vbs
Very cool indeed.


Method #3 - Use SCONFIG
As noted on my "Manage Windows Server 2008 R2 Core with SCONFIG" article, SCONFIG is a very nice tool that is now built into R2, that you can use to manage many aspects of the Server Core machine. One of these features is the ability to control the Windows Updates settings, and then use it to download updates and either selectively install them, or install them all at once.
To run SCONFIG simply enter sconfig.cmd in the command prompt window, and press Enter.
First, enable Automatic Updates by typing "5" and pressing Enter.
Type "a" and press Enter.

Next, type "6" to get SCONFIG to search and download missing updates.
You'll be able to install all missing updates, or just the recommended ones.


Method #4 - Visual Core Configurator 2008
Visual Core Configurator 2008 is a nice GUI-based tool created by Guillermo Musumeci. The tool is free to use, and can be obtained here:
After downloading the tool, either copy the files to the Server Core machine, or if it's a virtual machine, use the ISO file download instead.
Run the tool.
Press on the "Windows Update" icon.
Press on the "Search for updates" button.
Select the updates you want to download and install, and press on the "Download and Install Updates" button.


Method #5 - Install Using Core Configurator 2.0
On of the first 3rd-party GUI tools for Server Core, this tool is free to use, and can be obtained here:
Run Start_Coreconfig.wsf to start the tool.
The latest version of Core Configurator needs .NET Framework and PowerShell, which it will automatically install once the tool is executed.
You will be prompted to join the customer Experience Improvement Program. Accept or decline.
Press the "Control Panel" button.
Press the "Windows Updates" button.
First, you can configure the Auto Updates settings.
Then, press on the "Check for updates" link and press the "Download updates" button.
You can now select which updates to install.


Hope This Will Help!!!
Amarpal Singh Sandhu